Subgroups
Introduced in GitLab 9.0.
With subgroups (aka nested groups or hierarchical groups) you can have up to 20 levels of nested groups, which among other things can help you to:
- Separate internal / external organizations. Since every group can have its own visibility level, you are able to host groups for different purposes under the same umbrella.
- Organize large projects. For large projects, subgroups makes it potentially easier to separate permissions on parts of the source code.
- Make it easier to manage people and control visibility. Give people different permissions depending on their group membership.
Overview
A group can have many subgroups inside it, and at the same time a group can have only 1 parent group. It resembles a directory behavior or a nested items list:
- Group 1
- Group 1.1
- Group 1.2
- Group 1.2.1
- Group 1.2.2
- Group 1.2.2.1
In a real world example, imagine maintaining a GNU/Linux distribution with the first group being the name of the distro and subsequent groups split like:
- Organization Group - GNU/Linux distro
- Category Subgroup - Packages
- (project) Package01
- (project) Package02
- Category Subgroup - Software
- (project) Core
- (project) CLI
- (project) Android app
- (project) iOS app
- Category Subgroup - Infra tools
- (project) Ansible playbooks
- Category Subgroup - Packages
Another example of GitLab as a company would be the following:
- Organization Group - GitLab
- Category Subroup - Marketing
- (project) Design
- (project) General
- Category Subgroup - Software
- (project) GitLab CE
- (project) GitLab EE
- (project) Omnibus GitLab
- (project) GitLab Runner
- (project) GitLab Pages daemon
- Category Subgroup - Infra tools
- (project) Chef cookbooks
- Category Subgroup - Executive team
- Category Subroup - Marketing
The maximum nested groups a group can have, including the first one in the hierarchy, is 21.
Things like transferring or importing a project inside nested groups, work like
when performing these actions the traditional way with the group/project
structure.
Creating a subgroup
Notes:
- You need to be an Owner of a group in order to be able to create a subgroup. For more information check the permissions table.
- For a list of words that are not allowed to be used as group names see the
dynamic_path_validator.rbfile under theTOP_LEVEL_ROUTES,WILDCARD_ROUTESandGROUP_ROUTESlists:
TOP_LEVEL_ROUTES: are names that are reserved as usernames or top level groupsWILDCARD_ROUTES: are names that are reserved for child groups or projects.GROUP_ROUTES: are names that are reserved for all groups or projects.
To create a subgroup:
-
In the group's dashboard go to the Subgroups page and click Create subgroup.
-
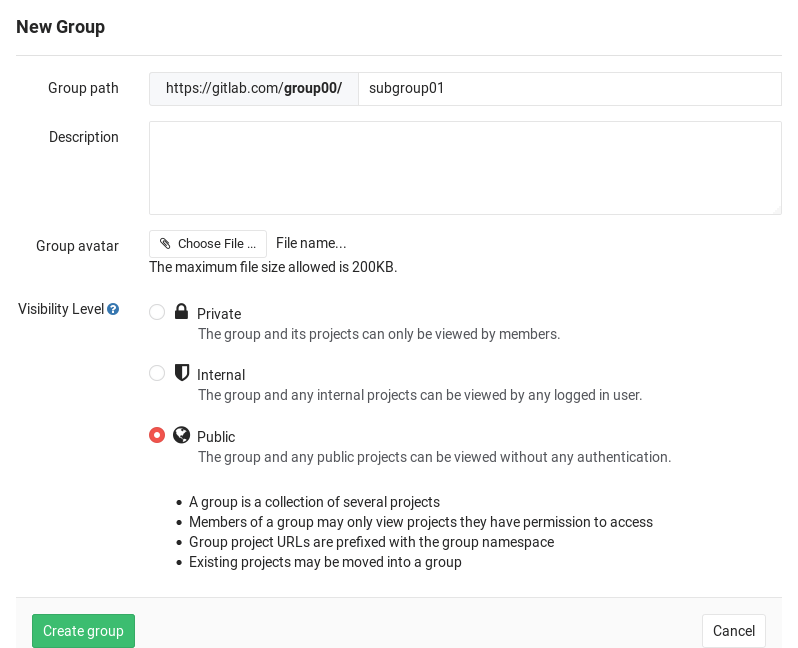
Create a new group like you would normally do. Notice that the parent group namespace is fixed under Group path. The visibility level can differ from the parent group.
Click the Create group button and you will be taken to the new group's dashboard page.
You can follow the same process to create any subsequent groups.
Membership
When you add a member to a subgroup, they inherit the membership and permission level from the parent group. This model allows access to nested groups if you have membership in one of its parents.
The group permissions for a member can be changed only by Owners and only on the Members page of the group the member was added.
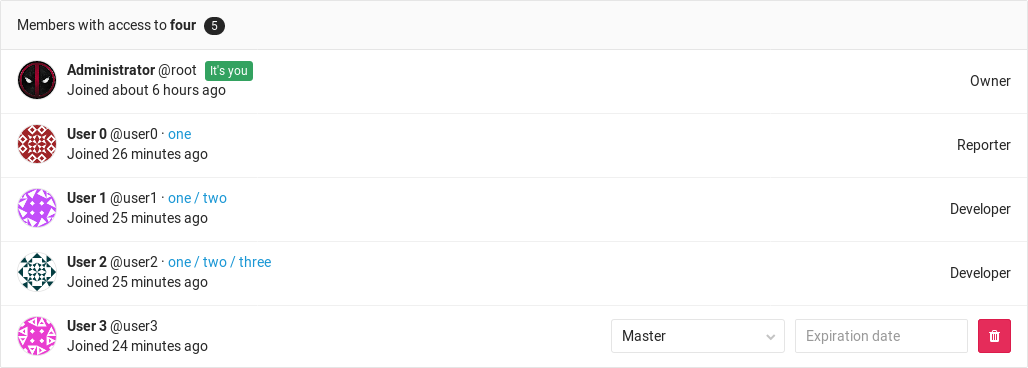
You can tell if a member has inherited the permissions from a parent group by looking at the group's Members page.
From the image above, we can deduct the following things:
- There are 5 members that have access to the group
four - User0 is a Reporter and has inherited their permissions from group
onewhich is above the hierarchy of groupfour - User1 is a Developer and has inherited their permissions from group
one/twowhich is above the hierarchy of groupfour - User2 is a Developer and has inherited their permissions from group
one/two/threewhich is above the hierarchy of groupfour - For User3 there is no indication of a parent group, therefore they belong to
group
four, the one we're inspecting - Administrator is the Owner and member of all subgroups and for that reason, same as User3, there is no indication of an ancestor group
Overriding the ancestor group membership
Note: You need to be an Owner of a group in order to be able to add members to it.
To override a user's membership of an ancestor group (the first group they were added to), simply add the user in the new subgroup again, but with different permissions.
For example, if User0 was first added to group group-1/group-1-1 with Developer
permissions, then they will inherit those permissions in every other subgroup
of group-1/group-1-1. To give them Master access to group-1/group-1-1/group1-1-1,
you would add them again in that group as Master. Removing them from that group,
the permissions will fallback to those of the ancestor group.
Mentioning subgroups
Mentioning groups (@group) in issues, commits and merge requests, would
notify all members of that group. Now with subgroups, there is a more granular
support if you want to split your group's structure. Mentioning works as before
and you can choose the group of people to be notified.
Limitations
Here's a list of what you can't do with subgroups:
- GitLab Pages are not currently working for projects hosted under a subgroup. That means that only projects hosted under the first parent group will work.
- Group level labels don't work in subgroups / sub projects
- It is not possible to share a project with a group that's an ancestor of
the group the project is in. That means you can only share as you walk down
the hierarchy. For example,
group/subgroup01/projectcannot be shared withgroup, but can be shared withgroup/subgroup02orgroup/subgroup01/subgroup03.


